Welcome to the IBM Websphere Commerce Hub
Before start, Make sure your system configurations are enough to install WCS
Keep all the installables at one place. let's say
•
C:\softwares\IBM-WCSv7-win32-installer-includes folder contains files that are downloaded from IBM

Un-zipped
Installer available at:
•
C:\softwares\IBM-WCSv7-win32-installer\ contains all the installable files.
Prerequisites:
i.
Install 7-zip for the
extraction of zip files.
ii.
Use "7-zip -> Extract
Here" options for all the zips in the respective folders.
iii.
Have valid IBM ID credentials handy and this will be used for checking and update versions while installing setup and when prompted to login.
1.
Update IBM Installation Manager
(IM) to v1.8.7.x
i) If IM is not installed in the machine, then first go to Step 2, else continue.
i) If IM is not installed in the machine, then first go to Step 2, else continue.
i) Verify the version of IM. If v1.8.7.x, go to Step 3, else continue
ii) Launch IM, select File -> Preferences...
iii) Select Repositories, select checkbox "Search service repositories during installation and updates."
iv) Select Updates, select checkbox "Search for Installation Manager updates"
v) Click OK.
vi) Click Update, if asked for IBM ID, please provide valid IBM credentials.
vii) Continue with IM updates and then restart.
viii) Go to Step 3.
2.
Install IM:
i) If already you have IM installed in the machine, then perform IM updates as mentioned in Step 1, then continue with Step 3.
i) If already you have IM installed in the machine, then perform IM updates as mentioned in Step 1, then continue with Step 3.
ii) Go to <wcs7-installer-dir>\RADv8.5.1\RAD_SETUP folder.
iii) Select launchpad.exe, and right-click and select Run as administrator.
iv) On the IBM Launchpad window, click "Install IBM Rational Application Developer for Webspahere Software".
v) New IM window with Install Packages view will be launched. Deselect all packages, except IM, and continue with IM installation. If asked for IM Shared location, specify: C:\IBM\SDPShared.
vi) Once installation completes, restart IM.
vii) Go to Step 1.
3.
Install RAD v8.5.5.3 + WAS Test Environment (32-bit only) v7.0.0.29 (or above)
Location: C:\IBM\SDP
Shared Location: C:\IBM\SDPShared
Location: C:\IBM\SDP
Shared Location: C:\IBM\SDPShared
i) Launch IM, select File -> Preferences...
ii) Select Repositories, use Add Repositories to add the following:
- C:\softwares\IBM-WCSv7-win32-installer-zips\WCSZips\RADv8.5.5.3-updates\RAD\disk1\diskTag
- C:\softwares\IBM-WCSv7-win32-installer-zips\WCSZips\RADv8.5.1\RAD_SETUP\repository.config

iv) Verify the version of RAD, it should be v8.5.5.3 or higher. Also verify the version for WAS v7 (32-bit) Test Environment, it shuld be v7.0.0.43 or higher.
v) Otherwise, click Check for Other Versions, Fixes, and Extensions.
vi) If IBM ID was not provided earlier, then it will not fetch the latest version from IBM update site. Then try adding a new Repository: "http://download.boulder.ibm.com/ibmdl/pub/software/rationalsdp/v75/rad/updates/" in IM -> Preferences -> Repositories -> Add repositories..., which would prompt for IBM ID credentials. Please provide the same and then try again the Step v
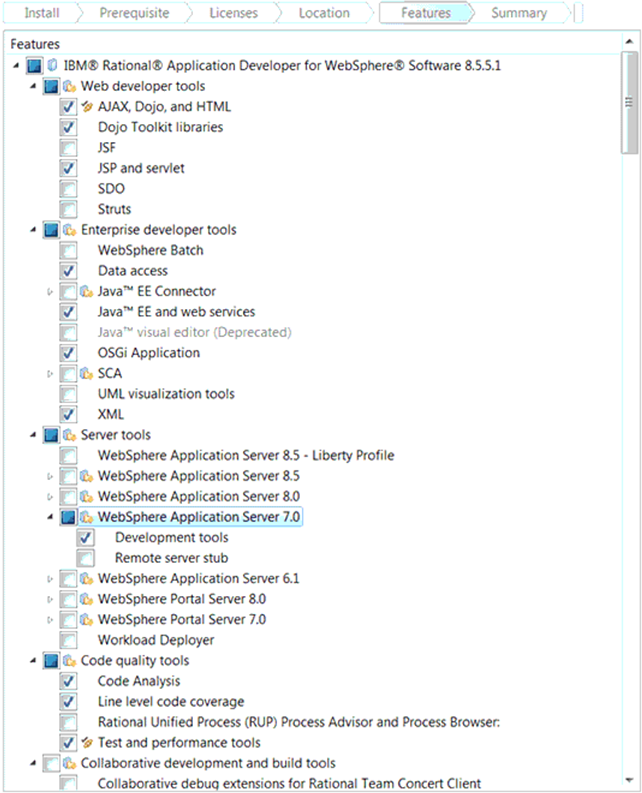
vii) Select the following features on the Install Packaging panel. You can select other tools in addition to the ones listed, but you must enable these features:
viii) Do not select Create a profile on the Configuration for IBM WebSphere Application Server panel.
ix) Complete RAD v8.5.5.3 installation
4.
Install WCS v7.0 + WCS v7.0.0.9 (FixPack9)
Location: C:\IBM\WCDE_ENT70
Location: C:\IBM\WCDE_ENT70
i) Launch IM, select File -> Preferences...
ii) Select Repositories, use Add Repositories to add the following:
- C:\softwares\IBM-WCSv7-win32-installer-zips\WCS7-FP9\repository.config
- C:\softwares\IBM-WCSv7-win32-installer-zips\WCS7\repository.config
- C:\softwares\IBM-WCSv7-win32-installer-zips\WCS7-FEP8\developer\repository.config
- C:\softwares\IBM-WCSv7-win32-installer-zips\JR55273.FEP_8.0.0.0\repository.config
- C:\softwares\IBM-WCSv7-win32-installer-zips\JR55273.FP_7.0.0.9\repository.config
* IBM WebSphere Commerce Developer edition 7.0.0.9
* JR55273.fp for WebSphere Commerce Version 7 Fix Pack 9 1.0.0.0
iv) Select Installation Location: C:\IBM\WCDE_ENT70
iii) Complete WCS v7.0.0.9 installation
5.
Install WCS7-FEP8 (Feature Pack 8)
i) Launch IM, select File -> Preferences...
ii) Click Install, then select the following update packages:
* IBM
WebSphere Commerce Developer Feature Pack 8.0.0.0
* JR55273.fep for WebSphere Commerce Version 7 Feature Pack 8 1.0.0.0
* JR55273.fep for WebSphere Commerce Version 7 Feature Pack 8 1.0.0.0
iii) Skip the Configuration enablement Features panel. Do not enable features now.
iv) Complete WCS v7 FEP8 installation
6.
Install interim fixes JR55296.fp
and JR55296.fep by using the WebSphere Commerce Update Installer (UPDI)
i) Go to <wcs7-installer-dir>\updii.70091.windows.ia32\UpdateInstaller
ii) Select install.exe, right-click and select Run as administrator. Then complete UPDI installation.
iii) Launch Command Prompt as Administrator, and locate to C:\IBM\WebSphere\UpdateInstaller folder.
iv) Execute: update.bat
v) Select WCS installed location: C:\IBM\WCDE_ENT70\, from the dropdown.
vi) Provide interim fix *.pak folder: <wcs7-installer-dir>\JR55296.FP_7.0.0.9, and complete the installation.
vii) Repeat Step 7 -> vii), and provide interim fix *.pak folder: <wcs7-installer-dir>\JR55296.FEP_8.0.0.0, and complete the installation.
7.
Verification Step: Verify C:\IBM\WCDE_ENT70\logs\setup.log file.
If exists, check for any errors. If no errors, then move to Step 8. If errors, or do not exists, then perform the
below steps:
i) Verify the value of the RAD_HOME variable in C:\IBM\WCDE_ENT70\bin\setenv.bat file. Update the same with this value: set RAD_HOME=C:\IBM\SDP
ii) Launch Command Prompt as Administrator, and locate to C:\IBM\WCDE_ENT70\bin folder.
iii) Execute: setupPlugins.bat
iv) Verify the contents of C:\IBM\WCDE_ENT70\logs\setupPlugins.log and makes sure that completes successfully.
v) Execute: setup.bat
vi) Verify the contents of C:\IBM\WCDE_ENT70\logs\setup.log and makes sure that completes successfully.
8.
Launch Command Prompt as Administrator, and locate to C:\IBM\WCDE_ENT70\bin folder. Then to
start WC Server from command prompt,
go to Step 9, else go to Step 10 to start the WC
Toolkit.
9.
To start the WC server, execute: startWCServer.bat,
and to stop, execute: stopWCServer.bat.
10.
To launch the WC Toolkit (i.e., RAD + WC Test Server), execute: startWCToolkit.bat.
11.
If any issues with WC Toolkit, like any issues with imported projects
or WC Test Server not listed in the Server view, then perform the below steps:
i) Stop WC Server, if running, and also close all instances of RAD.
ii) Launch Command Prompt as Administrator, and locate to C:\IBM\WCDE_ENT70\bin folder.
iii) Execute: restoreDefault.bat
iv) Verify the contents of C:\IBM\WCDE_ENT70\logs\restoreDefault.log and setup.log and makes sure that completes successfully.
v) Go back to Step 10 to launch the WC Toolkit.
References
•
Installing WebSphere Commerce Developer by using the IBM Installation
Manager - https://www.ibm.com/support/knowledgecenter/en/SSZLC2_7.0.0/com.ibm.commerce.install.doc/tasks/tigdevtoolkit_gui.htm
•
Installing Rational Application Developer Version 8.5.5 - https://www.ibm.com/support/knowledgecenter/SSZLC2_7.0.0/com.ibm.commerce.install.doc/tasks/tiginstallrad855.htm
•
Error: Invalid entry path:
workspace/WC/Catalog-ProductManagementData.jar/com/ibm/commerce/catalog/helpers/properties/rank.properties
- https://www.ibm.com/developerworks/community/forums/html/topic?id=9603538e-eb7f-4c4a-88eb-7d1e75d23253
•
Error: wasprofile folder not getting created during installation - https://www.ibm.com/developerworks/community/forums/html/topic?id=77777777-0000-0000-0000-000013878771#77777777-0000-0000-0000-000013878771
•
Installation failed for WCS7 Fixpack9 -
Error during "post-install configure" phase:
C:\IBM\WCDE_ENT70\logs\updiInstall.log (The system cannot find the path
specified.)
java.io.FileNotFoundException: C:\IBM\WCDE_ENT70\logs\updiInstall.log
(The system cannot find the path specified.)
- Manually created
a logs folder and an empty text file
(logs\updiInstall.log) inside C:\IBM\WCDE_ENT70\ for installation to
complete successfully.


No comments:
Post a Comment